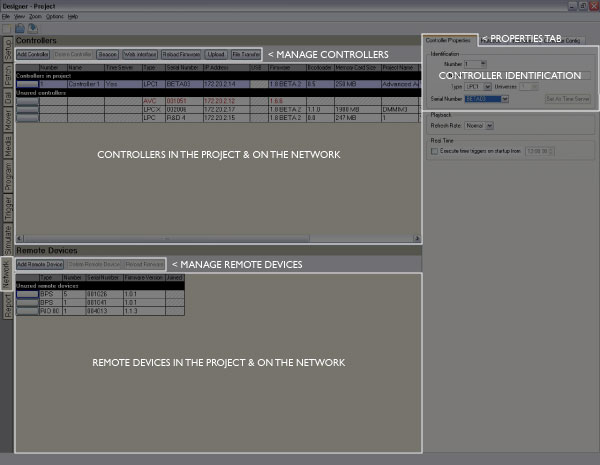
It is here that you connect your project programming in Designer with real, networked Pharos Controllers:
The list of Controllers is split into two sections: At the top is the list of project Controllers which may or may not be associated with real Controllers. Underneath is a list of all the unused real Controllers found on the network that have not been associated with project Controllers.
When you create a new Designer project a single LPC with 2 output universes is added to get you started. These project Controllers are purely virtual and so must be associated with a real Controller on the network before you can Output Live or Upload.
IMPORTANT: You can only associate a Controller running the same firmwareThe embedded operating system, stored in internal flash memory or on the Compact Flash card. as Designer - Controllers running incompatible firmware will be displayed in red. To update a connected Controller's firmware see Controller firmware.
If you will use a different type of Controller for your project, such as a TPC for a touch screen interface
The Controller has now been added to the project.
If the project has a TPC with an EXT then the EXT will be configured automatically by the TPC. You can add an EXT to a TPC in project by checking the 'Configure EXT' check box in the TPC's Controller Interfaces tab.
IMPORTANT: Deleting a project TPC or LPC that has been patched will result in the loss of this patch data.
If your project requires audio visual control, for example a plasma screen or projector, then you will want to add one or more AVCs. However, unlike LPCs, project AVCs are added or deleted only when you add or delete a generic AV fixture in Setup.
Once you have added and configured your project Controllers (all that is required for programming and simulating) you must associate them with real Controllers on the network.
Once all your project Controllers have been associated with real Controllers you can configure them, test your programming on the installation itself and finally upload to the Controllers for stand-alone operation.
One Controller in your project must be allocated as the Time Server, the first project Controller added is chosen by default. The Time Server is responsible for network playback synchronisation and for issuing realtime and astronomical clock triggers. To set the correct date and time set, see Controller Configuration.
IMPORTANT: Controllers must be running the same version of firmwareThe embedded operating system, stored in internal flash memory or on the Compact Flash card. as the Designer software. Uploading a project file to a Controller running different firmware may result in the project failing to load and run. Check the Controller's home page to determine compatibility before attempting a remote upload.
This feature allows you to use the Controller's memory card as a remote memory device for file storage and retrieval, typically the exported Designer project file to ensure that this remains on site with the installation for future maintenance. Note that files to be transferred in this way must adhere to the MS DOS 8.3 naming convention.
File transfer should not be confused with Upload.
Pressing the File Transfer button in the Network pane will launch an FTP client on Mac OS X. By default, this client is Finder, and Finder doesn't allow write access to FTP servers. In order to send files to a Controller from Mac OS X, you will need to install another FTP client. We recommend Cyberduck (http://cyberduck.ch/) which is free.
When you first run Cyberduck, you should be prompted to make it the default FTP client. You should choose to do this. If you are not prompted, or Cyberduck is not used as the FTP client when attempting to perform a file transfer to a Controller, go to the Preferences in Cyberduck and under the FTP tab, there is a 'Default Protocol Handler' option. Set this to Cyberduck.
The fields in the controller spreadsheet provide status information:
| Number | The unique identifier given to each Controller in the project |
| Name | The user name given to each Controller in the project, typically a name that identifies the Controller's purpose or location |
| Time Server | "Yes" indicates that this Controller set as the Time Server |
| Type | The type of Controller |
| Serial Number | The Controller's serial number as found on the base of the Controller |
| IP Address | If connected via Ethernet the Controller's IP address which is either statically assigned or obtained from a DHCP server |
| USB | "Yes" indicates that the Controller is connected via USB |
| Firmware | The Controller's firmware version which must match that of Designer |
| Bootloader | The Controller's bootloader version |
| Memory Card Size | The size of the Controller's memory card, this can be user upgraded if required |
| Show Name | The name of the project that has been uploaded |
| Watchdog | "Yes" indicates that the Controller's watchdog is turned on |
| Used Channels | The number of used channels on the Controller |
| Capacity | The number of available (unused) channels on the Controller |
| Joined | "Yes" indicates that the Controller has joined the Designer session because it has been associated and the project files match |
| Output Live | Check this box (the default) if you want the Controller to participate in Output Live (see below) |
While all the other columns give status feedback, the Output Live cell is editable and allows you to stop a Controller from participating in Output Live. This is useful for soft openings where you may have multiple Controllers in various geographical zones, some of which are open to the public and so need to be protected from your programming and testing efforts in another zone. Uncheck this box to disable.